
AI Painting Problems: 7 Fixes for Better Results
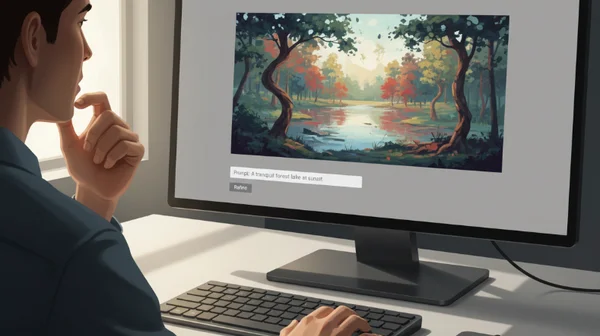
You have uploaded your favorite photo, selected a beautiful artistic style, and waited eagerly for the AI to create your masterpiece. However, when the image finally appears, you are met with blurry details, distorted colors, or an effect that just doesn’t match your vision. Why does AI painting sometimes fail to meet expectations?
The truth is that even the most advanced ai painting generator can struggle with certain types of images or settings. Creating digital art requires collaboration between you and the AI. When results miss the mark, specific technical factors are usually responsible.
In this guide, we will explore the 7 most frequent problems users face and provide actionable fixes for each. By understanding how the ai painting tool processes your images, you can achieve professional-looking results every time. Let’s dive into how you can turn those "glitches" into gallery-quality art.
Blurry AI Art: How to Sharpen Your Digital Masterpiece
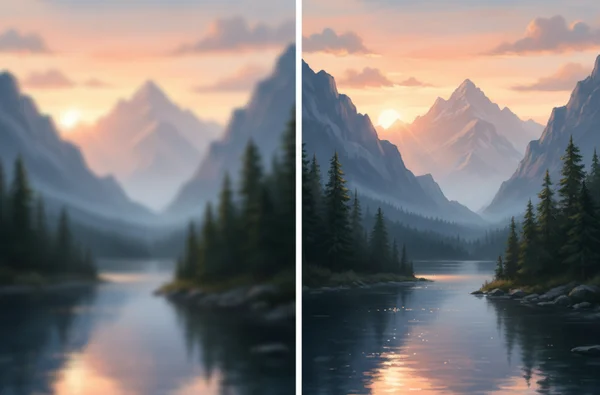
One of the most common complaints is that the final output looks soft or "muddy." Instead of the crisp brushstrokes of an oil painting, the image looks like it was viewed through a foggy window.
Why AI Paintings Lose Sharpness
AI paintings often lose sharpness because of the way "diffusion" works. The AI attempts to blend the pixels of your original photo with the textures of a specific art style. If the original photo has "noise" or if the AI struggles to identify the edges of objects, it creates a blurred effect. This is a common issue with ai image quality when the source image lacks clear contrast.
3 Proven Methods to Fix Blurry AI Paintings
-
Use High-Contrast Photos: AI finds it easier to apply styles when there is a clear difference between the subject and the background.
-
Pre-Sharpen Your Image: Use a basic photo editor to increase the "structure" or "sharpening" of your photo before uploading it. This gives the AI better "anchors" to work with.
-
Opt for Defined Styles: Styles like "Cyberpunk" or "Abstract Art" often handle sharpness better than very soft "Watercolor" styles, which are naturally more blended.
AIPainting.io Settings for Crisp Results
To ensure you get crisp ai art, always check your aspect ratio settings before generating. Choosing a 1:1 ratio for portraits often helps the AI focus its "attention" more effectively on the central subject, reducing peripheral blur. At AIPainting.io, we prioritize clean style transfers to ensure your edges remain defined even in complex styles like Ghibli. Learn about our professional-grade upscaling features for print-quality outputs.
AI Color Problems: Fixing Mismatched Painting Palettes
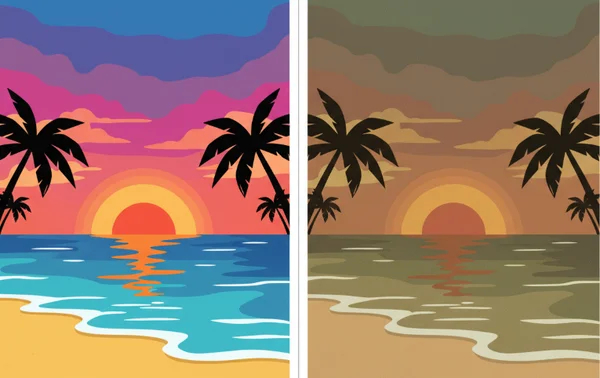
Have you ever turned a bright beach photo into a painting, only to find the colors look dull or completely different from the original? Color mismatch is a frequent hurdle in the photo to painting process.
Understanding AI Color Translation Limitations
AI models translate colors based on the "training data" of a specific style. Choosing a style is like picking the right paintbrush—you must match it to your creative vision. For example, if you choose an "Oil Painting" style modeled after 19th-century masters, your photo might challenge the AI's color interpretation. The technology might lean toward warmer, earthier tones like browns and ambers, even if your original photo was bright blue.
Color Calibration Tips Before Uploading
If you want specific colors to stay vibrant, try "over-saturating" your photo slightly before you upload it. By making the colors more intense in the source file, you give the AI more "pigment" to work with during the transformation. Also, ensure your photo is well-lit. Shadows often turn into muddy greys when processed through an ai art generator.
Post-Processing AI Art for Perfect Color Balance
Sometimes, the best fix happens after the AI finishes its work. If the result is a bit too dark, a quick adjustment of the "Exposure" or "Saturation" in any free photo app can bring the AI painting back to life. Think of the AI output as your "digital canvas" that might need one final polish from the artist—you.
Style Application Failures: When AI Misses the Artistic Mark
Sometimes the AI simply doesn't "capture the vibe" you were looking for. You wanted a Ghibli-style landscape, but it looks more like a generic cartoon.
Why Certain Styles Work Better Than Others
Different artistic styles require different levels of detail. A "Minimalist" style works best with photos that have a lot of empty space. Conversely, a "Fantasy Art" style thrives on complex textures. If you try to force a complex style onto a very simple photo, the AI may add "hallucinated" details that look messy or out of place.
Selecting the Right Photo for Your Chosen Style
For styles like "Oil Painting," choose photos with strong lighting and shadows. For "Watercolor," photos with soft lighting and natural subjects work best. When you try different styles on the same photo, you will quickly see which artistic "logic" matches your image best.
Troubleshooting Style-Specific AI Art Issues
If a style like "Cyberpunk" looks too dark, try choosing a photo with many small light sources. If "Ghibli" looks too realistic, try a photo with a bright, blue sky. Matching the content of your photo to the spirit of the style is the secret to a perfect application.
Composition Problems in AI Generated Art
Composition is about where things are placed in the frame. Sometimes, the AI focuses on the wrong thing, like making a background tree more detailed than the person in the foreground.
How AI Handles Elements in Your Photo
The AI views your photo as a collection of patterns. If your subject is too small in the frame, the AI might categorize it as "background detail" and apply less artistic focus to it. This leads to a lack of a clear focal point in your final ai painting.
Editing Techniques to Improve AI Art Composition
The best fix for composition is the "Crop" tool. Before uploading, crop your photo so the subject takes up at least 50% of the frame. This forces the ai painter to spend most of its processing power on the subject you actually care about.
Resolution and Quality Issues in AI Paintings
Nothing is more disappointing than a beautiful painting that is too small to print or share. Understanding resolution is key to digital art.
Understanding Resolution Limitations in Free AI Tools
Many online tools limit the output resolution to save on processing power. While these are great for social media, they may lack the "DPI" needed for high-quality printing. The AI generates what it can based on the input. If you upload a tiny, pixelated thumbnail, the output will stay low-quality.
Maximizing Output Quality with Your Source Images
To generate high quality art, always start with the largest file size possible. A high-resolution JPEG or PNG provides the AI with more data points to create smooth gradients and fine lines. Even if the tool has an output limit, starting "big" ensures the AI doesn't have to guess what the details should look like.
Unexpected Artifacts and Distortions in AI Art
"Artifacts" are those strange, unintended marks—like a person having six fingers or a tree turning into a cloud. These distortions can break the immersion of your art.
Common AI Artifacts and Their Causes
Artifacts usually happen when the AI is confused by overlapping shapes. If a person is holding a coffee cup and the colors are similar, the AI might merge the hand and the cup into one strange object. This is a side effect of how ai art from photo models try to find patterns where none exist.
Prevention and Correction Methods
To prevent artifacts, choose photos where the subject's limbs and objects are clearly separated. If you do get a small distortion, don't worry! Most can be fixed by slightly cropping the image or using a "clone stamp" tool in a basic editor to remove the stray mark. The goal is to give the AI a "clean" path to follow.
AI Painting Style Consistency: Achieving Cohesive Results
If you are trying to create a series of paintings—perhaps a set of travel photos—you might find that the "Oil Painting" style looks different on every single picture.
Why Style Consistency Varies Between Images
The AI interprets each photo's unique lighting differently. Identical style settings can yield varied results because the technology adapts to your specific image. A sunny photo will look like a bright impressionist painting, while a cloudy photo might look moody and dark.
Techniques for More Predictable AI Art Results
To create consistent art, try to use photos taken in similar lighting conditions. If you are making a gallery, edit your photos to have the same brightness and contrast before you run them through the AI. This creates a "baseline" that helps the AI apply the style consistently across all your images.
Your Path to Perfect AI Paintings Starts Here
Taking control of AI art generation means understanding how to guide the technology. With these fixes for blurriness, color matching, and composition, you can elevate your results instantly. Fix three key areas to solve most AI art issues. Use high-contrast photos to reduce blurriness, calibrate colors before processing, and optimize composition through cropping.
Remember, the AI is a powerful brush, but you are the artist holding it. Whether you are a digital illustrator looking for inspiration or a hobbyist wanting to turn a pet photo into a watercolor masterpiece, these seven fixes will help you achieve the results you deserve.
Ready to apply these fixes to your own photos? Explore ai painting today and transform your images into stunning AI art with confidence!
The Takeaway
Why does my AI painting look blurry and how can I fix it?
Blurriness usually happens when the source photo is low-resolution or lacks contrast. To fix this, use a sharp, well-lit photo and consider increasing the "structure" or "sharpness" in a photo editor before you start painting now.
Why does my AI painting look more faded than expected?
Think of the AI as an art student interpreting your photo. If colors appear washed out, your photo might challenge the AI's color interpretation. Try increasing the saturation of your source image before processing to give the AI more "pigment" to work with.
Can I really get professional-quality results from free AI painting tools?
Yes! While some free tools have resolution limits, you can achieve professional results by using high-quality source images and performing minor "post-processing" (like adjusting brightness or cropping) after the AI has generated the image.
What photo types work best for high-quality AI art generation?
Photos with clear subjects, distinct backgrounds, and strong natural lighting work best. Avoid "busy" photos with too many small, overlapping objects, as these can confuse the AI and lead to distortions or artifacts.
How do I choose the right AI style for my photo?
Match the style to the "mood" of your photo. Use "Ghibli" or "Watercolor" for bright, nostalgic, or natural scenes. Use "Oil Painting" or "Fantasy Art" for dramatic portraits and landscapes with deep shadows.
Why do some AI painting styles work better than others?
Each style is trained on different types of art. Some styles are designed to be "forgiving" and abstract, while others are very precise. Success depends on whether your photo's original shapes and colors align with that style’s specific artistic "rules."